Pages

Wednesday, December 16, 2015

Lumber Jacking

It's been a while since I posted here and it's not because I haven't been doing things... it's just that what I've been doing wasn't all that exciting or new.  Now, I have something I've never really done before... lumber jacking!  I had a rather big pine tree die and I've been staring at the thing for maybe two years, thinking about having it taken down, thinking about the damage it was going to do to the house when it fell because it most certainly would have hit the house if it fell in the right direction.  Last week I had a fellow come up the drive as I was out washing the van and he asked if he could give me a price on bringing down the two dead pines in my back yard.  I told him it was one tree that split about half way up.  He takes a look and tells me $150 to fell it, cut it up, and put the pieces off the grass in the back.  I told him to have at it.  I don't think it took 30 minutes from the time he and his partner got out of the truck until they got back into the truck to leave.  They dropped it across the back yard and I was quite surprised by the incredibly loud bang it made when it hit.  Now I had a lot of logs because it was really like a tree and a half what with the split.  Knowing I had to do something I decided to split the logs.  I don't think I've used my fireplace more than 5 times since I've lived here and I don't have a fire pit but what the heck, something to do that I'd not done before. 

I've split a few logs in my days and I know it's very, very hard work.  I knew I had a LOT of wood to split so I picked up a manual hydraulic splitter and along with my little electric chainsaw I had at it.

I put together a storage/drying thingie -- I really don't know what they're called -- and got it situated off to the side of the house.  Took a while to get the base level but it was done.
 
 
The tree just before they wacked it down.  Big damn tree!
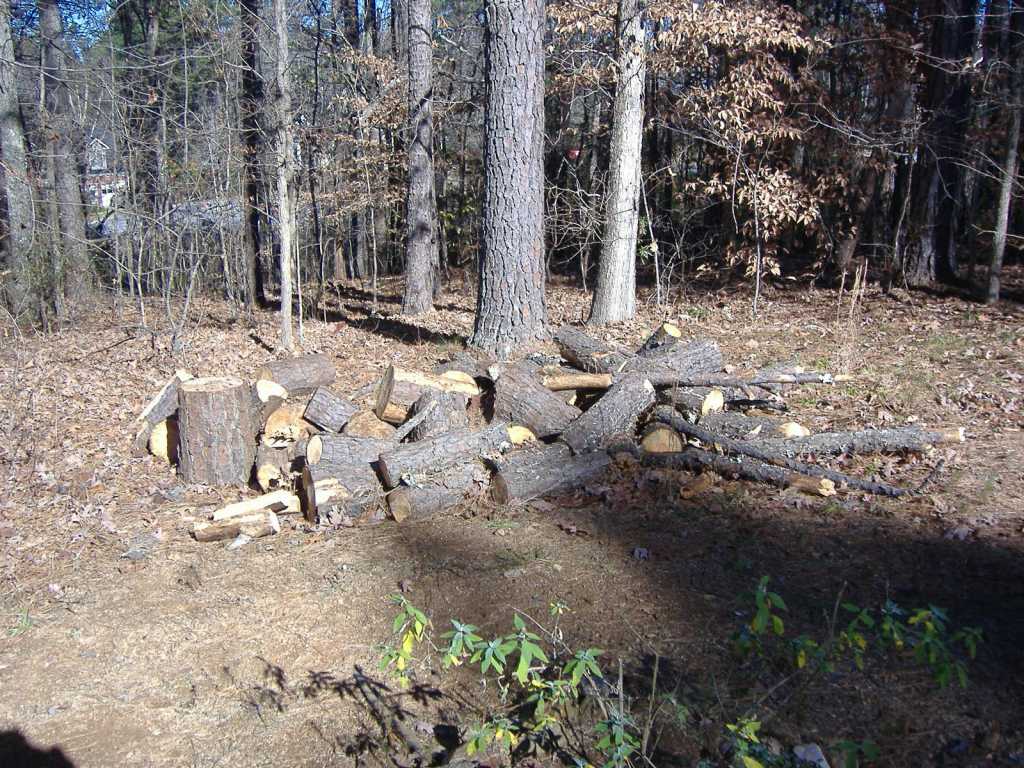
 
What's left of the pile after a day of splitting.  I should have counted the pieces but I didn't.  I'm guessing 50-60 pieces or so based on what's left and what I split.  I know I split a lot of logs and looking at the end of the day the pile didn't seem any smaller. 
 
My little chainsaw and the new splitter.
 
The first day I set up my work area not really knowing what I was going to do but it worked out all right.  I got done what had to be done and didn't cut my leg or arm off.
 
Today, the second day, I enhanced my operation a bit and things went about as easy as they could for me.  Again, no limbs severed or even nicked.  I will say that twice as I was pulling a log off the splitter after the first split I pulled it too soon and the damn log clamped down on my fingers, hard, and it was a royal pain to get it out.  I actually had to walk around the house to the garage, 'wearing' the log, to get a breaker bar to pry the log open.  After the second time I changed how I took the log off the thing.
 
Full load.  That rack is 6 feet by 4 feet so it's a lot of wood.  There is plenty more to do -- I'd say I've done about half of it -- but I'll have to think about when I'm going to do it and how to store it when I do.  All in all, some good work and now I can build a fire in the fireplace should the mood suit me.  More importantly, with my splitter and all the experience I've picked up I'm really getting excited about getting my trailer on a few acres just so I can do this some more! 


Saturday, January 10, 2015

Liking The Look

After getting a kick out of myself for making curtains for the breakfast area I decided to have a go at the main room and the foyer.  This project was more than twice as big which resulted in the worst part of doing this... having to go to four (!!!) Walmarts in one day to get the seven sheets I needed for the project.  I learned a couple of things making the first curtains so the making of these went a little easier and they turned out a bit better although you'll never see the differences.  Again, a lot of fun and I didn't even injure myself!

The 'before' shot looking out onto the deck.
 
And the 'after' shot, closed and open.
 
The 'before' looking out the front of the house.  A little hard to see but the temporary, paper shades held up for a month short of five years and did what they were put up for... blocking the direct afternoon glaring sun.  I'm glad I put them up because they gave me time to think how to cover the windows.  I cannot relate how many ideas I went through for putting blinds/curtains/shades up and never liked any idea for one reason or another until just recently.  I'm very glad I waited.
 
And the 'after' shot, closed and open.
 

Sunday, January 4, 2015

Curtain Practice

My daughter-in-law, Samantha, has let me know that she'd appreciate me putting some curtains together for her to hang in their eating area.  No problem and I'm sure she'll get around to picking a fabric some day after tending to the other 984 things on her to-do list.  In the meantime, I figured I could do with some practice.  I've made curtains before but the last I did were for the van, were quite short, and that was about 16 months ago.  I've wanted something on the windows in my house since I moved in but the windows themselves make it a bit tough and I've thought through many, many ways to do it without liking a single idea I had.  Well, I figured a way that I might like to do it so I went ahead and did it.

The kitchen eating area, or whatever it's called, in my house.  Pretty much all glass, including the door, but it is always just so nice to see outside.  Kind of bleak now as it's winter and it was raining when I took these 'before' shots. 
 
Of course fabric was needed.  I wanted something green because I like green and it would match the chair cushions on the chairs around the table.  I also wanted some kind of print... not solid.  Well wouldn't you know it?  Just what I wanted... a green floral pattern on an off-white background!  Not wanting to skimp I paid full price for these flat twin-sized sheets... $4.97 at Walmart.  And the finished results...
 
The 'closed' look, providing some privacy when all the leaves are off the trees in back but still letting light come through the top panes.  Took this shot as it was getting dark outside.
 
And the 'open' look which I must admit, I really like.  Putting the tie-backs up a bit higher than is normal opens just about the whole window letting in the light that I like and allowing me pretty much the same open view I had before.  All in all... I'm happy.  Now I guess I'm going to move on to do the foyer and 'big' room.  A man's work is just never done :)


Saturday, December 27, 2014

Silly Grandpa

On Christmas morning I unwrapped a gift that had been made for me by my incredibly talented grand daughters.  I found an assortment of wood pieces that had been hand painted by the little artists tied up with some string.  Well, I had no idea what the collection was but what with the string and all I figured I was supposed to make some kind of hanging decoration or something like that.  I left the pieces alone for a bit and then later in the day, wanting to play with my Christmas 'toy' I figured I'd make a collage out of the pieces.  I took to arranging them this way and that and decided upon a configuration I liked and glued the pieces together.  Before too long I got a call from the kids asking how I liked the puzzle.  What puzzle??  Then I cracked up because I had never thought of it being a puzzle and now that it was glued together I'd never see it assembled.  Silly Grandpa.  Things happen... got to go with the flow.  So, here is my puzzle-collage!

The now-known-to-be puzzle pieces, glued and clamped into what I thought would be a good looking arrangement.  Great to have something to play with on Christmas morning!
 
After attaching a little hanger to the back and regluing a couple pieces that had come off as I hammered on the hanger my hand-made puzzle-collage hanging on the wall.  Nice :)
 
 
And now my breakfast area looks to much the better, what with a glaring empty space now being occupied with the new art piece.  Thanks Hannah and Riley... it's wonderful !!  Of course I will always be wondering if I could have figured out the puzzle and what it would have looked like :)


Thursday, November 20, 2014

Little Engine

So the cold weather really came to Georgia this week and that made it time to turn to 'inside' projects that have been waiting for just such a time that I would not be working or playing outside.  Last Christmas my daughter-in-law gave me a little building project knowing that I like to make things with my hands and such.  Bless her heart... her intentions were so good.  Of course now I know that she probably got this sucker from some old people torture web site!  I'm figuring it's going to take a few days to be able to focus my eyes normally.  Regardless, the project is completed and it will go along side my other little projects although the others aren't quite so little.

I think this is the first project I've every worked on where EVERY tool I used was bigger than the final assembly was going to be.  I stopped to take this on day 2 I think it was because it seemed I just kept going to bet more tools including the dowel to use to bend pieces around.  That's the work in progress sitting on the pale yellow instruction sheet.  Easy to follow instructions.  Of course not a word of direction... just pictures.
 
Just after I finished... 4th day on the project... I'm thinking about 14 hours.


All done.  Just a shot to show that this little sucker is indeed little.  No way to show the complexity of the project and I won't relate any conversations I had with myself along the way when dealing with the incredibly small and fragile/thin pieces.  Regardless... thank you, Samantha, for giving me a cold weather project to keep busy with :)


Saturday, October 18, 2014

Van Awning

As some may be aware I'm taking off for a week-long trip in Florida and having discovered the very nice Florida state park system I'm going to be camping for 6 of the 7 nights.  No problem, I'm all set with my nice new spring-hung cot, little fold-up table, and my experience gained last year as to what I need to bring (little) versus what I can leave behind (a lot).  One thing I would have liked to have had was an awning for the van to provide a bit of shelter if it rains.  I looked around on the web and there are many available.  I didn't like any of them for one reason or another and I was a bit taken aback by the price of the suckers.  So, being a person with a bit of free time and figuring I can rig up something that is easily attachable to/removable from the van, easy to set up and take down, and costs as close to $0.00 as I can make it.  Well, I made one that I'm rather pleased with and got it done for $6.84 in new materials, using a brand new tarp I bought for something some time ago and found on the shelf in the garage a couple of weeks ago.  All in all... I'm rather pleased :)

OK... that's the handsome frame mounted onto the pretty useless cargo rack.  A couple of u-bolts and a bit of chiseling (of the wood) and I've got myself a frame that goes on in less than 5 minutes and is removable just as easily.  Whether or not it's going to fly off at highway speeds is yet to be found out but my confidence is high that all will stay in place.  But what about protecting the paint on the top of the van, you might ask.  Well...
 
... this model is equipped with nice heavy duty real rubber bumpers.  These pretty suckers protect the van and due to there aggressive tread pattern there should be no slipping.  Thanks for letting me take the blown bicycle tire, David.  I knew I'd use it for something some day, just not this soon :)
 
It took less than 45 seconds to hang the tarp from the mounts on the top of the frame.  This was my second attempt, actually.  It's pretty windy today and the tarp was blowing off the mounts.  I needed something easy to put on but that would stay in place to hold the tarp until I got the poles up.  So...
 
... I went back to the bicycle tire and crafted myself some rubber hold downs.  These soon to be patented slit rubber all purpose hold downs will be available soon.  Again, thanks for the tire, David :)
 
Poles up and secured and all is ready to go.  Total time to erect... less than 3 minutes by myself.  Note the color coordination of the frame and poles.  Nothing less than first class.
 
Same shot, this time with the side door open.  Plenty of coverage and plenty of room to stand upright within 4 feet of the door or so... a bit of bending over approaching the poles.  Now I'm ready to try this sucker out and I am definitely looking forward to it :)


Sunday, September 21, 2014

Entry Table

Since moving into this house I have wanted something to place between the 2 pillars in the foyer.  I knew what I wanted... a longish, narrow table of some kind... but hadn't come across anything that really seemed to suit the purpose.  So, in the spirit of continued learning and experimentation, I decided that I should make one.  More lessons learned and damn if I didn't make a mistake but I'm rather happy with it.
As always I started with the most choice raw materials.  In this case an 8 foot 1x12 and an 8 foot 2x6.  Have I mentioned how very much I enjoy having a van??  Easily sliding this stuff in the back and shutting the door is made so much more enjoyable as I watch the guy next to me in his mighty pickup truck balancing a similar load sticking off the back of the bed as he ties it down so it doesn't fall off the truck.  I always offer to help but never has it been accepted.  I think it has something to do with the image of the  'construction worker' type being seen as needing help from the geek in the crocs driving a mini-van.
 
I'm becoming more adept at rigging jigs to make working with the wood a bit easier.  Working with the longer shelf boards was not the big challenge I thought it was going to be.  This setup let me slide the boards in, adjust them, flip them over as necessary, and had my 'stops' all set. 
 
And the finished table.  Sized perfectly!  Now I just need to stop at a few flea markets and/or junk stores to get some stuff to put on it :)
 
While working on this I came up with an idea for my next project but that will have to wait a couple of weeks as I have to tend to the yard a bit and then I'm scheduled for a trip to see the kids!!


Tuesday, September 16, 2014

End Tables

My sawdust-breathing adventures continue and I'm having quite the delightful time of it.  I continue to experiment and learn and I do believe I'm reducing the number of dumb things I do when trying out design/construction attempts.  Something I really did want, not that I needed, was a couple of small end tables to accompany the love seat, so I made a couple.  This is my most ambitious 'shaping' project thus far and I did screw up a number of attempts prior to getting it right but I believe I did.  Again, I had a lot of fun doing it which is, I'm thinking, the number one objective :)

As they sit along side the loveseat.
 
Sitting on the hearth just for the light.

Tuesday, September 2, 2014

Little Stand

I didn't need this thing but wanted to try out some design things as well as doing a bit of practice.  I guess it's a small bookcase or 'thing' holder or a combination thereof.  As it always seems to be when I'm putzing around smelling sawdust, I had a good time doing it anyway.  Made a couple of mistakes but learned a couple of things for next time as well.  So... time well spent :)

I sized it to fit along this very short wall in my office bedroom which is where it's probably going to remain lest I give it away.
 
Putting some stuff on it makes me kind of like it.  Maybe I won't be so quick to give it away!
 

Wednesday, August 13, 2014

Feel Good Chair

Little Riley is little and one of the things that David and Samantha, and I when I'm visiting, was trying to find a chair that would let her sit at the table to eat in a more comfortable fashion.  I thought we had it solved when I brought over a very old metal kitchen chair but it was too high and wouldn't let her fit under the table.  This resulted in the little lady sitting back away from the table which made it very hard for her.  Well, I decided to just build one for her from scratch.  I've never made one before and I knew it had to be pretty sturdy to let her climb up onto it and such.  David gave me the measurements I needed during a phone call and then it was off to the races.  I really like doing this stuff but this project really had me feeling good.  It still makes me feel good!

Wanting to use only the best, premium raw materials I selected these 2x12's having first removed the boards I had previously nailed onto them for a project up in CT.  So, Riley's chair began life as a work table I had made for myself sometime while living in Florida about the time David was born.  Same table later served as a laundry table in Brookfield and then as scaffolding planks for some stairway painting both in CT and here in GA.  As said, only the best for my grand daughter.
 
I got all the big boards cut down to working size, sanded a bit, and then the pieces cut for the chair.  This was my first time working with compound miter cuts which went pretty well.  Hardest part for me was then working to keep all these multiple angle pieces 'square' to the piece as a whole.  I made a couple of easy jigs and things moved along smoothly from there. 
 
All the joints cut in the pieces and each lettered/numbered so I would know where they all went when it came time to assemble them.  Trying to keep the angles running the correct way gave me fits but I only screwed up one of them necessitating making a new piece.  I'd call that a major success.  The legs are on the left... kind of look like Jenga pieces!
 
The legs assembled and the top boards joined together to make a solid seat.  I took this photo while thinking how I was going to join the top to the legs.  Hadn't thought that far ahead! 
 
All assembled with a coat of primer on it.
  
Ta da!!  All done and ready to be delivered.
 
Finally got myself back over to visit the kids and deliver the chair to Riley.  As said I felt very happy the whole time I was making it and Riley's reaction was just some loving icing on the happy cake.  Best part for me, and her parents, is that it was sized properly!  Now she can crawl up and join the rest of the family for dinner just like the big girl she is.  Grandpa Bob is very, very happy to have helped her out.
 
Love that little kid :)  The matching panties were a coincidence!
 

Sunday, June 29, 2014

Benches


Last year or the year before I made some benches to hold potted flowers and such and they worked very well for the purpose.  Nothing fancy, just useful.

Here's one doing it's job last summer. 
 
Well things change and the butterfly bushes are in the ground and I found the roses, still in pots, do better in a different place in the yard.  I didn't need the benches anymore and I offered them to Samantha and David who will likely use them for similar purposes in their new yard.  Much to my dismay the benches got attention from Samantha's father, which is high praise indeed coming from a craftsman, and also from a good friend of theirs.  I came home with an 'order' for 2 benches to be delivered my next time visiting NC.  As I've been noting my projects here I figured I'll put the 'bench project' up.
 
They're not fancy and I just use construction 2x4's to make them.  First step, sand off the mill marks and such.  They're not fancy but I don't want them looking tacky!
 
I split the 2x4's down the middle.  I don't use 2x2's because it's hard to find a straight one and I also need one flat edge.  As you know, the edges (corners) of a 2x4 or 2x2 are rounded a bit.  This isn't Garry's incredible word-working barn but it worked pretty well.  I purposely made the height of the new workbench the same height as the saw table just to hold long/large lumber pieces like this.  So, it goes in this end...
 
... and it comes out this end.  Notice the brilliant use of an old grill stand as a run-out table.  I can turn it sideways when cutting large sheets of plywood.  Doesn't look like much but it's sturdy, it works, and it was already on wheels :)  This set up really worked well and I never had to hold up a piece of wood... just slid it through the saw.
 
All the lumber ripped down and ready to be finished and, as if by magic...
 
... it's all done.  I used a different finish than I did last time and although this is quite pretty, it took 2 coats and was a bit hard to work with.  We'll see if I use it again.  It's a lot of finishing... 512 feet of surface to be covered... twice.  By far this step requires the most time to both get the finish on and then drying time between and after coats.  This ate up parts of 3 days.  Did I mention it's incredibly boring as well ???
 
All the pieces cut to size and ready to assemble.  You can probably tell it's enough for 4 benches.  That long piece is leftover... about $1.87 worth :)  I bought 8 2x4's and only needed 7 1/2.  I'm rather sure I'll come up with some use for it, practical or not.
 
Voila!!  Two the completed benches.  One is 2" shorter than the other because that's what the requestor asked for so that's what she's getting.
 
That's it... the bench project!  I really, really like doing this stuff and making these 4 benches had me working on them for 5 days, some days longer than others, and it was 5 great days of pleasure.